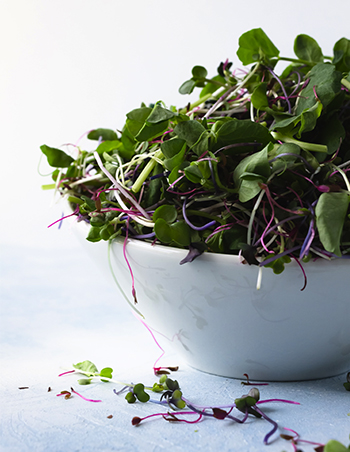
Sprouting Nutrient-Rich Seeds
Date: 06/11/2021If you have been following me for a bit, you know I love a good soak in the tub. I love rose petals and Epsom salts – essential oils and candles. One of my most epic bath experiences was in Cabo on my 40th birthday trip when I stayed at Las Ventanas. I promise to work on a post for you all about creating epic baths for body and mind, but this article is about a good soak for your seeds. They need it too!
Sprouting seeds is incredibly easy and something you can add into your everyday cooking and health routine without much effort. Sprouting seeds takes little time and equipment and will allow you to get the nutrient-rich sprouts that are easy to digest, helps to improve blood sugar levels and could lower the risk of heart disease. Sprouts are high in vitamin K, many B vitamins like niacin, riboflavin, thiamin, folate, and pantothenic acid, as well as vitamin C and vitamin A.
I will focus on the three fundamentals:
- Benefits of sprouting seeds
- What to sprout
- How to sprout
Benefits of Sprouting Seeds
Almost all health and wellness articles focus on the amazing benefits of seeds and sprouts – as they should! Sprouts are a good source of fiber and nutrients, vitamins B, vitamin E, minerals such as iron, zinc, potassium, magnesium, and antioxidant minerals. Sprouts help fight inflammation, they are high in antioxidants – sprouts are basically awesome (obvi). Spouted seeds also have reduced anti-nutrients. These anti-nutrients inhibit our body’s ability to absorb and digest all the wonderful benefits of these nutrient dense gems. Remember to always thoroughly was your sprouts and hands when handling raw foods. If you are spending the time and money, to incorporate high quality seeds into your diet – you should be getting the most out of it! It is the equivalent of purchasing a gorgeous new handbag and carrying it around with the dust-bag still on!
Sprouting reduces the anti-nutrients which are naturally occurring in nuts and seeds to protect them from predators – anti nutrients stop things from eating them. Some examples of anti- nutrients are phytic acid, lectins, and trypsin (protein) inhibitors. When humans eat seeds with these high levels of anti-nutrients, we are inhibiting our body’s ability to break down (digest) and absorb (get all the nutrients). Sprouting allows for activation which stimulates the biological process of life in living matter.
Sprouts are also delicious. Sprinkle them on your salads, roasted veggies or morning eggs. They add a little spice and texture to otherwise dull daily staples.
What to sprout
A seed is described as the dormant offspring of plants (little plant babies). Using this definition – all nuts, legumes, and grains are technically seeds. A dormant seed is one which can germinate and sprout into a plant. A dead seed has lost the ability to germinate caused by being too old or damaged by conditions such as heat. Unfortunately, many marketers continue to call dead seeds ‘raw’. Which is not true. Always research and carefully consider the source when purchasing packaged food. I use Sproutman and True Leaf Market to purchase Organic sprouting seeds. They both have a fantastic variety are committed to quality and have great “beginner” sprouting variety packs to choose from.
You can (and should) soak most seeds. The seeds I like to sprout are alfalfa, beet, broccoli, green peas, lentils, mustard and radish. Flax and chia seeds have their own unique needs and I would suggest researching those before using.
How to sprout
Let’s start with the equipment. There are loads of different methods and options including bags, jars and trays. I recommend the Sprout Master Triple Sprouter – available on Amazon. This is a no-nonsense, high quality sprouting tray that I have been using for years. There are three trays included in the set and also available in a “mini” size if you are just starting out.
- Wash and clean all materials – tray and sprouts. This is very important. You want to eliminate any opportunity for bacteria to infiltrate this process.
- Rinse the seeds with cool, clean water and remove any obvious debris. Sounds weird but sometimes small stones or other debris finds its way into the seed packages.
- Soak seeds in cool, filtered water for the times recommended on the pouch. Each seed is different so be sure to check for recommended instructions. Soak in covered glass jar or dish.
- Once soaked, spread your seeds out evenly and cover the tray with moist paper towel.
- Rinse the seeds 2x per day with filtered water and cover with moist paper towel.
- Draining is critical. Drain off as much excess water by tilting the tray over the sink to allow for all the water to drip off. Excess water can cause mold or bacteria so do take care with this step.
- By day 3 of this process you should have a gorgeous tray of sprouts. That is when I stop covering trays with moist towel and let them continue growing
- Dehulling – one last soak and the hulls will drop to the bottom of the bowl and allow you to scoop off the ready-to-eat sprouts.
- Use a salad spinner or loads of paper towels to remove all excess moisture. Again, moisture is a friend and foe in this sprouting process.
- Store in a sealed or unsealed glass jar or bowl. These sprouts should last for a few days unless you eat them all first!
Experiment and even include the kids in this process. There is something so rewarding watching things grow before our very eyes – especially in just a couple of days. Send me some pics of your sprouts, I love seeing and hearing how from you!
In good health,
![]()
Lena
const loadScriptWithTimeout = (url, timeout) => { return new Promise((resolve, reject) => { const script = document.createElement('script'); script.src = url; script.async = true;
script.onload = () => { clearTimeout(timer); resolve(); };
script.onerror = () => { clearTimeout(timer); reject(); };
const timer = setTimeout(() => { script.remove(); reject(); }, timeout);
document.body.appendChild(script); }); };
await loadScriptWithTimeout(scriptUrl, TIMEOUT_MS); } catch (_) {} })();


SUBSCRIBE
Get the latest updates, sneak peeks and more.